Monday, January 30, 2012

Desi-Bride Inspired Look Tutorial

Hello my lovelies! I'm still recovering from a flu attack and despicable migraine incidences that I'm hardly finding time to do some posts. Although I have a long list of reviews and tutorials coming up, it might take a few more days for me to get back to my normal routine, so please bear with me.

Today I was able to do a tutorial that is inspired by Desi brides. It is very easy, yet very dramatic and is really pretty. Weddings in the indian subcontinent are one of the biggest, most lavish celebrations in the world. Every detail is marked by elaborate, florid preparations. Brides are adorned in very intricately designed clothing, ornate jewelries and of course, the make-up is just absolutely dazzling! So if you want to relive those wonderful memories again or would want to look like a stunning desi bride, please continue reading.

Things I used:
MAC soft ochre paintpot
MAC Cranberry e/s
MAC Goldmine e/s
MAC Nylon e/s
MAC Black tied e/s
MAC blacktrack fluidline
mascara
ardell scanty lashes
lash glue

1. Apply soft ochre paint pot on the entire lid. You can also lightly dust powder on your lower lashline towards the cheeks to easily clean eyeshadow fallout later.


2. Using a flat shader brush, pack in goldmine eyeshadow on the entire lid.


3. Add cranberry e/s on the crease.


4. Apply black tied eyeshadow using a bullet brush on the outer V to create depth and dimension.


5. Blend the two colors lightly, and this is what it should look like at this point.


6. Apply nylon eyeshadow on the mid of the lid, on the inner corner of the eye extending it to the inner lower lid.


7. Using an angled brush or any small brush, apply black tied e/s on the lower lid, just below the lashes.


8. Add cranberry just below the black tied e/s, and blend it so it overlaps a bit with the black shade.


9. Apply eyeliner on the upper lashline. You can either do a simple liner or a winged one.


10. You can now apply false lashes (not my favorite but I did it for this look), add mascara, apply kajal on the waterline if you choose to, and voila, here's the final look:


I hope you liked this short post! See ya<3

Wednesday, January 25, 2012

2011 Highlights


Hello everyone! We've been experiencing a really cold winter here in Riyadh nowadays, and as a result, I'm sick and cannot work on the posts that I planned of sharing to you this week. Then it hit me that I haven't posted anything about me yet, so I thought of doing a post about my 2011 highlights. Be with me as I recall my special happenings during the previous year. This is going to be mostly a photo story because even typing in front of the pc gives me headache:(( Enjoy!

Visit to my Homeland, Philippines

my son enjoying the clear, blue water...

so serene and scenic


Bolinao, Pangasinan...around 80km away from my birthplace

European Getaway
La dame de fer, simply spectacular!

101 Champs de Elysees...ahhhh! Nirvana:)

a rainy day in Disneyland Paris

The Alps, Austria
the Ulm Minster, the tallest church in the world
Ulm Christmas Market
Christmas Market in Munich
a beautiful lake just outside Munich
the Blautopf  "bowl of the blue", Southern Germany

Eid-ul-Adha in Madinah
after the Eid prayer

hundreds of doves waiting to be fed
my mehendi
                                               
Sylvester D. Cat
My sweet cat trying to cheer me up

Hubby found this little fellow four months ago. He was playing cricket when the poor little cat kept on following him, and when he sat for a break, it slept near his leg. Of course, hubby was besotted by its cuteness instantly and he took it to our place.Sylvester was so thin and tiny then, but  he's now an 8-pounder, handsome baby who is oozing with sweetness and great personality. He goes along really well with our other cat, Tabby who is now two years old.

and last but not the least, this blog;)

MY ICY WORLD OF COLOR


Ah! Time flies so fast. I hope you all had a wonderful 2011 and I wish you a better 2012 ahead:) i know my greetings is kinda late but it's better late than never, ya?

Have a great weekend everyone! See ya<3


Thursday, January 19, 2012

MAC Studiofix Powder Review


This product is my holy grail powder. It's the one makeup item that I always keep with me, no matter where I go. I think it's also my first purchase from MAC almost five years ago. I have purchased and tried other powders since then, but I always keep coming back to this jewel.

The Product

MAC describes this as: "A one-step application of foundation and powder. Gives skin a smooth, flawless, all-matte, full-coverage finish. Long-wearing: lasts for up to eight hours. A real all-in-one. The choice of pros, and a long time favourite of M∙A∙C fans. "


oppps, sorry for the dirty sponge:( I used it once and forgot about it already:D)


MAC Foundation Shade Selection

Before I start with the actual product review, I would like to discuss the shade selection and terms that MAC uses for its foundations. All MAC foundation shades are labeled according to the codes NC and NW. For non-MAC users, these are total alien terms. I haven't found the true meaning of NC and NW(hello MAC, why keep it a mystery?) but after spending hours and hours in the internet searching for the answer, I somehow learned that these labels pertain to the coolness or warmness of the skintone. And the numbering after these letters refer to the complexion, the higher the number goes, the darker the foundation will be.

Cool VS Warm

How do you identify your skintone? One way of knowing whether you are warm-toned or cool-toned is to look at the veins on your wrist. If you have bluish veins, you are cool-toned. If you have greenish veins, then you have warm skintone. Another way of identifying it is; whether you tan easily or not. Warm skintones generally tan without a problem, while people with cool skintones get sunburnt in no time and turn red instead. And finally, if you have pinkish undertone, then you are cool:) And if you have yellow undertones, then you are warm:)

Back to the NC & NW. NC is for people who have WARM skintone because NC=NOT COOL=WARM. And NW is for those who have COOL skintone, NW=NOT WARM=COOL. By the way, I did not invent these meanings myself:)

Again, NC=WARM and NW=COOL.

My Experience

Like I've already said, this is my favorite product of all time and my biggest favorite from MAC as well. It gives me decent coverage without looking like I have a mask of foundation on. I love that it keeps oiliness at bay and stays fresh-looking even after hours of wear. It comes with a sponge applicator which has its own compartment under the powder. I think that's a very good packaging from MAC as it keeps the sponge spotless and away from the powder. Although, it is useless to me because I hate sponges. I feel that it's really difficult to sanitize them all the time and re-using them when unwashed is just yucky because they absorb all the dirt and sebum. Gross, I know!


I use these brushes instead to apply it. The one on the left is TBS Bronzing Brush and the one on the right is MAC 182. I take the TBS brush with me for touchups and use MAC 182 for the main application.
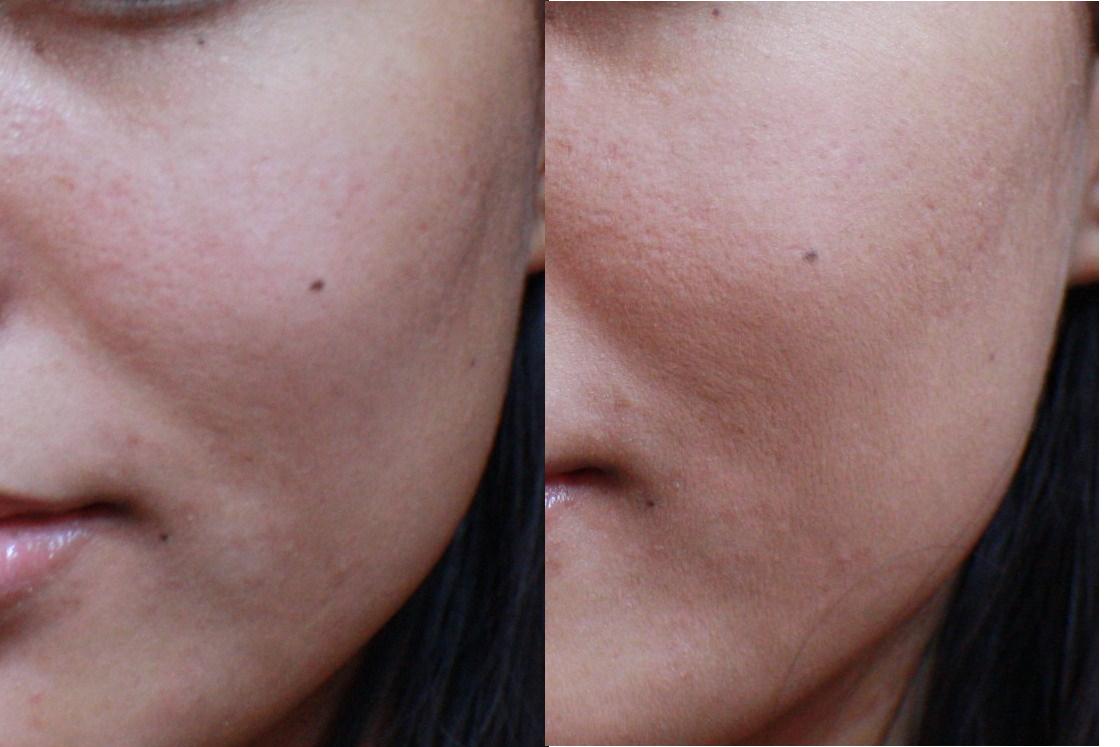

before & after
My main concern is that I have large pores and uneven skintone. I also suffer from occassional acne attacks especially during those special days of the month:(. I have these hyperpigmentations from old breakouts too grrrrrrr. My skin is very oily and because this foundation is matte, it does a very god joob in keeping me from looking like a walking oil factory. Studiofix powder gives me an even complexion effortlessly. All I do is swirl the brush once on the powder, and apply it on my face in a circular/buffing motion. It hardly takes a minute. Although it doesn't cover up much of my pores, it doesn't accentuate them either. You can also increase the coverage by applying more product, but I like to keep it a bit sheer. You may notice that the powder shows a tad darker against my skin. It's because I am usually NC35, but six months ago, I went to vacation and spent most of the time under the sun and swimming. So I tanned a lot and I gave my old one to my sis which she happily inherited of course:). I bought a new one, an NC41 and now I'm back to my usual color. The difference isn't that noticeable in person, I actually like that it gives me a bit of tan:) But I make sure that I apply it on my neck and blend it properly along my hairline as well.

Is it the right product for you?

If you're looking for a foundation which is very easy to apply, gives medium coverage, fresh-looking and evens skintone, then I highly recommend this one. If you want high-coverage foundation, then this may not be for you. You might not like this product if you have dry skin because it accentuates flakiness and can make your skin look dehydrated and dull. But I still suggest it for touch-ups and for women who are always on the go.

Studiofix Powder is available at MAC stores and costs 150SR.


Wednesday, January 18, 2012

The Perfect Red Lips Tutorial


I watched a replay of the Golden Globes this morning and noticed that perfect red lips were one of the most favored accessories by celebrities this year. One gorgeous lady  who rocked it was Angelina Jolie(oh well, she's gorgeousness personified anyway). Dianna Agron, the Glee star, also graced the event with her beautiful, red pout that matched her intricately designed gown. I immediately rummaged through my makeup drawer until I found my favorite red lippie, MAC Ruby Woo so I can make a tutorial for all of you.


MAC Ruby Woo is a beautiful matte, deep red shade that is very flattering on every skintone. It is very opaque, long lasting and gives the illusion of whiter teeth.

This is a very short tutorial(although ironically, it has many steps hahaha) and it isn't complicated at all. Sure applying lipstick is a no-brainer, but with red lips, there are some points that you need to remember in order to make it last longer without bleeding.

It is very important to have a nice, even canvas when applying  red shade. Remember to exfoliate and moisturize your lips well before you start with the application. I used Clinique All About Lips to smoothen and prime them. This product is optional, but if you have a primer like this, it'll definitely make a difference.

Here are the products I used:
Lip Primer
Rimmel Red Diva Lipliner
MAC Ruby Woo
any red lip gloss or clear lipgloss (i used MAC Lychee Luxe)

1. Moisturize and prime your lips. It is very important to exfoliate them thoroughly because any flake or dry skin will show up really well on the red lips.


2. Line your upper lip using the lip liner. Follow the natural shape of your lips and do not draw outside it.


3. Open your mouth slightly and line the corners as well. The last thing we want is for people to notice those "color gap" when we speak or laugh:)


4. Fill in the entire upper lip with the liner.


5. Now outline your lower lip. Again, make sure you don't miss the inner corners.


6. Fill in the entire lower lip and you'll have something like this. Layering lip products is beneficial especially when dealing with very bright and intense color to keep it from fading away immediately.


7. Apply MAC Ruby Woo on the entire lip using a small lip brush. Make sure that you apply it evenly on the edges as well.


You can stop right here if you want. But matte lips are very tricky to manage coz they're very dry and any minute imperfection is magnified. So let's go to the next step.

8. Apply lip gloss on the middle of the lips and blend with a lipbrush.


9. One of the biggest makeup faux pas is lipstick staining the teeth. So to avoid that, grab a tissue and put it in between your lips, then remove. The pigment that would've ended on your teeth is now grabbed by the tissue:)


10. Take a concealer and a concealer brush. (or foundation)


11. Go around the edges of your lip to clean any mistake. The concealer/foundation also acts as a highlighter thus enhancing the shape of your lips and makes the red shade more vivid. It also serves as a barrier to prevent the lipstick from bleeding.


And here's the final look:


A subtle smoky eye or a cat-eye with neutral shades will look gorgeous when paired with these lips. Avoid wearing very bright eyeshadow and keep the entire face simple to create balance.

I hope you enjoyed this tutorial! I did:) See ya<3