Showing posts with label beginner's guide. Show all posts

Tuesday, May 21, 2013

How to lose 10 pounds in 10 minutes(or less)!

Hello everyone! I hope you are all doing good...I know some of you are very excited and maybe many (or actually MOST) are skeptical about the title of this tutorial. Well, yes indeed, this tutorial will teach you how to lose 10 pounds BUT the result won't appear on the scale. Those pesky extra baggage will still be there, we will just hide them using make-up and the outcome will be visible on your face instantly:)

I thought this is the best time for me to do this tutorial since I badly need some toning up (at least on my face for now:D). I am 30lbs above my usual weight and all those extra calories are on my face for everyone to see hahaha...My face is a cross between a round and a rectangular shape that even a single pound of extra weight is immediately noticeable. This trick really helps me a lot and looks especially awesome in pictures. 

This make-up technique is called contouring and highlighting. It involves using a darker shade( matte usually) than your skintone to create an illusion of depth and a lighter shade to make a certain feature more prominent. By using a darker shade under the cheek bones, we create a shadow making the face look slimmer and gaunt (hmmmm, gaunt in a nice way:D). The lighter shade is applied just above the apple of the cheeks to create fullness, thus creating an appearance of "high" cheek bones. This lighter shade is also applied on top of the forehead, the bridge of the nose,and  the cupid's bow to highlight them while the darker shade is also applied on the hairline, the temple and under the jawbones to complete the contouring part. These optical illusions combined together will make the face appear slimmer. But be warned that you should use  a very light hand while doing it because you could literally end up looking like Frankentein's monster:))

If you want to learn more about contouring and highlighting, follow the steps below, but before that, here are the things that you will need:


1) a matte powder/cream or bronzer that is one or two shades darker than your skin tone (MUFE Contour Kit)
2) a highlighter (Dior Shimmer Powder)
3) any contour brush (you can choose from any of the brushes above)
4) any fluffy/powder brush for blending

Steps:
1) Apply the darker shade just below the cheekbones(always tap off the excess powder on the brush). If you have trouble locating this area, make a fishy face by sucking in your cheeks as much as you can, the hollowed part is where you should apply the powder. Make sure you start from the outer part of your face near the ears and pull the brush down towards the corner of the lips. Use your eyeball as a guide and stop where it is when you're looking straight at the mirror.


 2) Pick up more powder and apply it on your temple and hairline.


3) Apply it on your jawline too and under the chin.


4) Now wipe your brush and add the highlighter. Apply it on top of your cheeks until just below the outer corner of the eye. Apply it lightly on your forehead, on top of the nose and the cupid's bow if you want.


5. Apply your favourite blusher on the apple of your cheeks and make sure you blend the powders together lightly with a fluffy brush. I used MAC Dollymix Blusher.


And here's the final result:

                             Before                                    w/ contour & highlight

with contour, highlight and blush

I hope you enjoyed this tutorial:) If you have any question/suggestion, please drop me a line on the comment box below. See ya<3

Saturday, February 18, 2012

Tightlining Tutorial

Hello everyone! I hope you're all doing good today. I have been receiving questions about tightlining ever since I made a post about eyeliners which you can read here. I was not in a very good mood to do a full eye make-up tutorial because my eyes are very droopy and looking very tired these days, so I decided to make a short tutorial on how I tightline instead.

Tightlining is a very easy way of adding a bit of glamour to the eyes without wearing a lot of make-up. It makes the lashes look a lot fuller and defines the shape of the eyes in a very natural, "sans maquillage" way. It is a simple process but might look a bit intimidating to beginners. It involves using an eyeliner to darken the roots of the upper lashes and the small strip of flesh under the upper lashline.

What you'll need:
Black Pencil
Gel liner(optional)

Procedure:

1. Dip the pencil on the gel liner (like you're writing a dot on the gel). Go immediately to step 2 if you don't have a gel liner.
UD 24/7 Glide on Pencil liner dipped on MAC Blacktrack Fluidline
If you're wondering about the gel's container, I back-2-MAC'ed it a few months ago and because it wasn't completely empty, I scraped the remaining product and transferred it to this vessel:)

2. Push your upper lashes slightly against the lid so the small strip of flesh under the upper lashline is exposed. You can either do this while looking straight at a mirror or you can also lay a small mirror on a flat surface then look down at it if you're more comfortable.


scary I know:D
3. Guide the pencil gently against the roots of the lashes and the area shaded above.


4. And here's the before and after look.


bare eyes

tightlined


The seemingly trepidating steps aren't as horrible as they look. And as you can see, my lashes look a lot fuller and my eye is looking more defined after tightlining, even without mascara. Your eyes might shed a few tears initially but as they get used to it, it'll get better. Practice makes perfect:) If you're feeling lazy but still want to look a little more polished, just do this step,add a few coats of mascara, apply blusher on the apples of your cheeks, add lipgloss and you're ready to go.


I hope you liked this tutorial and stay tuned for more! See ya<3


Thursday, January 19, 2012

MAC Studiofix Powder Review


This product is my holy grail powder. It's the one makeup item that I always keep with me, no matter where I go. I think it's also my first purchase from MAC almost five years ago. I have purchased and tried other powders since then, but I always keep coming back to this jewel.

The Product

MAC describes this as: "A one-step application of foundation and powder. Gives skin a smooth, flawless, all-matte, full-coverage finish. Long-wearing: lasts for up to eight hours. A real all-in-one. The choice of pros, and a long time favourite of M∙A∙C fans. "


oppps, sorry for the dirty sponge:( I used it once and forgot about it already:D)


MAC Foundation Shade Selection

Before I start with the actual product review, I would like to discuss the shade selection and terms that MAC uses for its foundations. All MAC foundation shades are labeled according to the codes NC and NW. For non-MAC users, these are total alien terms. I haven't found the true meaning of NC and NW(hello MAC, why keep it a mystery?) but after spending hours and hours in the internet searching for the answer, I somehow learned that these labels pertain to the coolness or warmness of the skintone. And the numbering after these letters refer to the complexion, the higher the number goes, the darker the foundation will be.

Cool VS Warm

How do you identify your skintone? One way of knowing whether you are warm-toned or cool-toned is to look at the veins on your wrist. If you have bluish veins, you are cool-toned. If you have greenish veins, then you have warm skintone. Another way of identifying it is; whether you tan easily or not. Warm skintones generally tan without a problem, while people with cool skintones get sunburnt in no time and turn red instead. And finally, if you have pinkish undertone, then you are cool:) And if you have yellow undertones, then you are warm:)

Back to the NC & NW. NC is for people who have WARM skintone because NC=NOT COOL=WARM. And NW is for those who have COOL skintone, NW=NOT WARM=COOL. By the way, I did not invent these meanings myself:)

Again, NC=WARM and NW=COOL.

My Experience

Like I've already said, this is my favorite product of all time and my biggest favorite from MAC as well. It gives me decent coverage without looking like I have a mask of foundation on. I love that it keeps oiliness at bay and stays fresh-looking even after hours of wear. It comes with a sponge applicator which has its own compartment under the powder. I think that's a very good packaging from MAC as it keeps the sponge spotless and away from the powder. Although, it is useless to me because I hate sponges. I feel that it's really difficult to sanitize them all the time and re-using them when unwashed is just yucky because they absorb all the dirt and sebum. Gross, I know!


I use these brushes instead to apply it. The one on the left is TBS Bronzing Brush and the one on the right is MAC 182. I take the TBS brush with me for touchups and use MAC 182 for the main application.


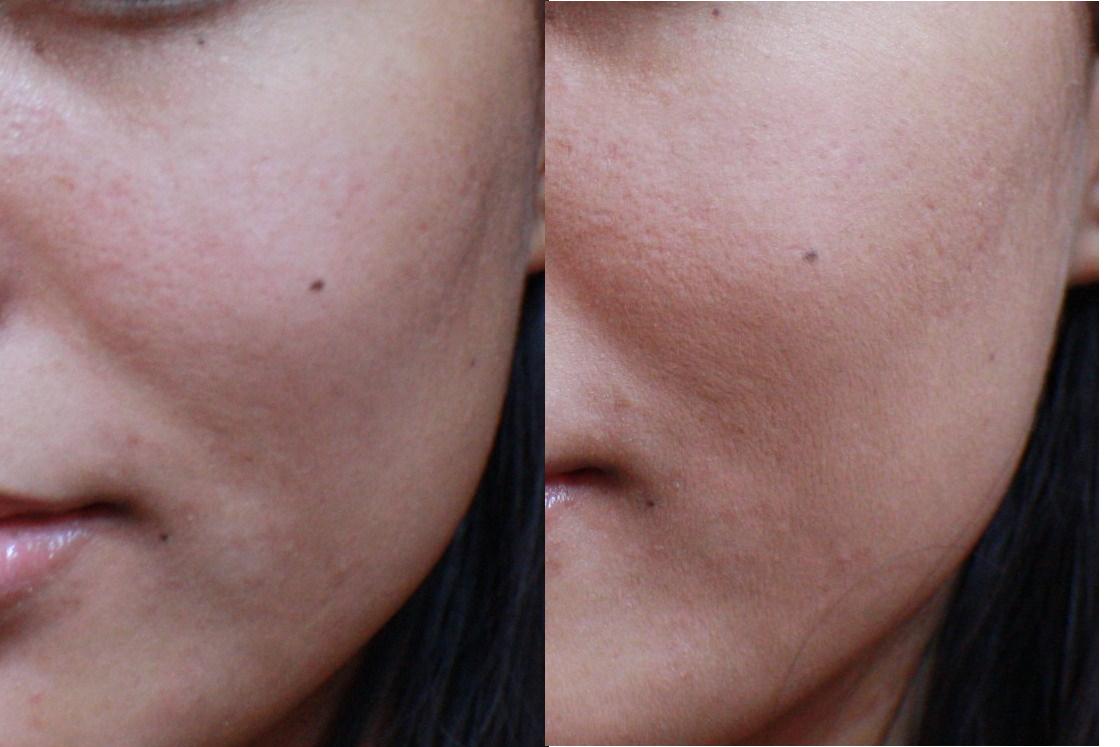
before & after
My main concern is that I have large pores and uneven skintone. I also suffer from occassional acne attacks especially during those special days of the month:(. I have these hyperpigmentations from old breakouts too grrrrrrr. My skin is very oily and because this foundation is matte, it does a very god joob in keeping me from looking like a walking oil factory. Studiofix powder gives me an even complexion effortlessly. All I do is swirl the brush once on the powder, and apply it on my face in a circular/buffing motion. It hardly takes a minute. Although it doesn't cover up much of my pores, it doesn't accentuate them either. You can also increase the coverage by applying more product, but I like to keep it a bit sheer. You may notice that the powder shows a tad darker against my skin. It's because I am usually NC35, but six months ago, I went to vacation and spent most of the time under the sun and swimming. So I tanned a lot and I gave my old one to my sis which she happily inherited of course:). I bought a new one, an NC41 and now I'm back to my usual color. The difference isn't that noticeable in person, I actually like that it gives me a bit of tan:) But I make sure that I apply it on my neck and blend it properly along my hairline as well.

Is it the right product for you?

If you're looking for a foundation which is very easy to apply, gives medium coverage, fresh-looking and evens skintone, then I highly recommend this one. If you want high-coverage foundation, then this may not be for you. You might not like this product if you have dry skin because it accentuates flakiness and can make your skin look dehydrated and dull. But I still suggest it for touch-ups and for women who are always on the go.

Studiofix Powder is available at MAC stores and costs 150SR.


Saturday, January 14, 2012

Mascara 101


To have long and curly lashes is every girl's wish. Unfortunately, not everyone is blessed with a set of full and gorgeous-looking lashes. But all is fair in love and make-up:) Mascara is a great way to bring attention to the eyes even when it's bare of colors. It opens up the eyes instantly and makes the eyes appear larger. Today I'll be doing another beginner's guide and this time I'll be talking about mascara. Please keep on reading if you want to know more about it.


Mascaras usually come in a tube with an applicator wand or a rod that is attached to its cover. It darkens, thickens, lengthens and curls the lashes. Black is the predominant color in the market but other colors have started making their entry as well including browns and blues.


Types of  Mascara


Lengthening VS Volumizing


You may be wondering what these labels mean on a mascara packaging. Basically, a lengthening mascara is designed for people who have stubby lashes. This kind of mascara lengthens and makes them look longer. On the other hand, a volumizing mascara makes the lashes look a lot fuller. It gives an impression of greater quantity of strands by thickening the roots. What if you need to lengthen and thicken your lashes at the same time? You can always have the best of both worlds.Layer a lengthening mascara under a volumizing one to get those false-lashes effect.


Manual VS Automatic


This seems to be strange when talking about a make-up tool but humans can't be the most advanced species for nothing right? Manual mascara is the old school. It's the tube with the wand and in order to apply it, you'll need to wiggle, roll and flick a few muscles in order to get the desired result. As for the automatic type, it is of course, powered by an external source and everything is done on your behalf. The wand oscillates automatically so all you need to do is keep it near your lashes, guide it here and there and voila, gorgeousness! But this luxury comes with a higher price tag of course.


Waterproof vs Non-waterproof


This is really self-explanatory. If you're planning to go swimming or going to attend a party where crying might be inevitable like a wedding, you'll need something that won't get washed away like dirt running down your cheeks. Albeit very useful, waterproof mascara on a daily basis can cause a lot of damage on the lashes. Because this type of mascara isn't easily removed, it can strain the lashes and cause them to become brittle and weak. And in worst cases, it might even cause them to shed.
 
Mascara Tips & Tricks
- Apply mascara by wiggling the wand from side to side then upwards to the tips instead of just "combing" through the lashes.  This way, the formula will stick to the roots which maximizes the volumizing effect to give you those highly-coveted Bambi lashes.

-Tilt your head backwards then look directly in the mirror while you apply mascara so your lashes are "away" from your lids.

-If this trick still fails you, grab a calling card(or any similar material) and use it to shield your lid from the wand. This is a foolproof method to prevent tidbits of mascara from ruining your obra maestra.

 
I prepared three mascaras for you to compare the effects. These are all volumizing, manual and non-waterproof. I applied two coats on bare lashes.
Covergir Lashblast


MaxFactor 2000 Calorie


Bourjois Volume Glamour

 
These mascaras give great results and don't cost a lot which is always a huge plus. My personal favorite among these is the Maxfactor 2000 Calorie because it gives fuller and longer looking lashes with minimum effort. I hope you liked it and expect more mascara reviews in the upcoming posts. See ya<3


Sunday, January 8, 2012

Eyeliner 101 and a Cat-Eye Tutorial


One of the most popular eye makeup all over the world is the eyeliner. It is used everywhere to beautify the eyes. In some cultures it is used as a means to ward off evil and some even believe that it can improve eyesight. But of course, I won't be giving you a long lecture about the history of eyelining because I'm sure wikipedia has an entire page about it:)

For cosmetic use, the main purpose of eyeliners is to make the eyelashes look fuller. It is also used to accentuate or enhance one's eye shape. It comes in various forms and is available in every color imaginable although black is still the most common choice.

Today I'll be giving you a short introduction about the common types of eyeliner that are available in the market.

Pencil Eyeliner

-the most common type and probably the easiest one to use since I'm sure everyone of us knows how to grip and draw a line using a pencil:) But there's one problem, pencil liner cannot create crisp and precise lines, so it's not a very good choice when you want to make a thin line especially on the upper lashline. It's however perfect for smudging and is thus a staple when making a smoky eye look. It's also soft enough to be used on the waterline and for tightlining.


Liquid Eyeliner

-this type of eyeliner is in an ink form which usually comes with a felt tip applicator. It creates very thin and precise lines. Liquid liners are the top choice in making winged liners. But when it comes to ease of application, this one is definitely the toughest to master, at least for me. Another drawback of a liquid liner is that it can't be used on the waterline.


Gel/cream liner
- just like what the name implies, it comes in a gel form and is applied with a brush. It can create a thick line as well as the thinnest of lines depending on the brush and the stroke. It's also safe to be used on the waterline. It's my top pick because of it's versatility.


Pen-style liner

- is a cross between a pencil & liquid liner. It is gaining a lot of popularity because it delivers the same precision that a liquid liner does with a lot of ease because it's in a pen form.


Now let's go to the difficult part, on how to actually line the eyes properly. Although it seems so simple and easy, eyelining is one of the more difficult aspects of makeup especially for beginners. Not that it's complicated but it requires a lot of accuracy and drawing the same perfect line for both eyes is really tricky. I'm gonna show you a short tutorial on how I do my eyeliner, specifically the winged eyeliner also known as cat-eyes.

The gel liner using the Sephora Eyeliner brush:
Start on the middle of the lid going towards the outer corner. Keep the line as close to the lashes as possible.


Extend the line going a bit upwards using your lower eyelid & the end of your eyebrow as guide as shown above.


Now line the rest of the upper lashline starting from the middle again, and making sure that the line is thinnest on the inner corner.


This is what it looks like at this point. Since I have narrow and small eyes, I skip lining the innermost corner.

Using the same guide, extend the tail of the line up to the desired length of your cat-eye.


Now flick the brush towards the end of the eyebrow to make a hair-thin tail for that signature cat-eye look.


And here's the finished product:) You can connect the line towards your lower lashes to create a more dramatic look.


And here's the cat-eye in action. I used MAC Patina all-over the lid, Woodwinked on the crease and Phloof to highlight the brows and the inner corner of the eye. I smudged UD 24/7 liner in zero on the lower lid and used Bourjois Clubbing mascara on the lashes.


I hope you found this post helpful. And don't be frustrated if you cannot perfect the eyelining skill on the very first attempt. It took me several tries and lots of make-up remover and q-tips before I was able to create decent lines. Never underestimate the power of practice and patience.

Please don't hesitate to leave me comments if you have questions, suggestions or violent reactions:) See ya <3

Wednesday, January 4, 2012

How to Groom the Eyebrows


Hello my lovely readers! I hope you're doing good today. I've been receiving some questions and comments about how to make the brows look neat and tidy so I thought of making this simple tutorial on how to groom the brows. This tutorial doesn't involve plucking/reshaping, it just gives definition and helps the strands stay in place. Please continue reading if you want to learn how to do it.

You will need the following:

scissors, spoolie, slanted brush, brow comb, matte brown eyeshadow,  Brow Gel

1) a small pair of scissors
2) a brow comb OR a spoolie/old and clean mascara brush
3) slanted brush
4) any MATTE brown eyeshadow
5) brow gel

Pointers to remember:
You don't need to use the exact same products that I used. You can use a brow pencil or any brown eyeshadow (no glitter, no sheen) and make sure you use a stiff brush. But never use a black eyeshadow/pencil because no matter how dark your complexion is, it'll look too harsh and unnatural. I use MAC Mystery eyeshadow because it compliments my medium complexion and black hair. Some other colors that you can use from MAC are CORK, ESPRESSO and WEDGE. You can always skip the trimming of the brows if you aren't comfortable with it.

1) Brush the inner corner of your brow upwards.


2) Trim the hairs that go past your natural shape. This helps in framing the brow.


3) Comb the strands following your natural arch.

5) Get your angled brush and dip it on the brown eyeshadow.


6) Fill in the brows starting on the arch(highest part) going down to the outer end. Use small feathery strokes rather than "drawing" a line. Make the line thinner as you go near the outer end and concentrate the color where your natural hairs are. Add some more eyeshadow if you need to, then fill in the rest of the brow from the arch to the inner corner. Don't put too much shadow on the inner corner or it'll look too harsh.


7) This is how it should look at this point.


8) Take the brow gel and comb it right through the strands following the shape of your brow. Using the brow gel will help set the eyeshadow so it won't smudge when you sweat and keeps the strands in place all throughout the day.


9) And this is the finished product. The shine will fade once the gel has dried so don't worry:)


Before and After

This may look and sound complicated but once you get used to it, it'll take only a couple of minutes to complete the entire process. And a well-groomed and neat looking brows do make a lot of difference:)

I hope you liked this post and if you have suggestions, requests or positive/negative reactions:D, please don't hesitate to comment. Thank you so much for reading! See ya<3